*Singing* Be a friend to the earth, cuz you know how much it is worth. It's worth more than gold. It's worth more than jewels. So help clean it up, AND DON'T BE A FOOL. Be a friend to the earth.
I kid you not that was a song my class wrote when I was maybe 8. I figured because of the title this would be one of the only times I would get to share this just missed out on the top 100, songs of the 90's you might have missed.
Anyways this post in no way apart from the song has anything to do with me being a friend to the earth. Not that I'm not her friend, I just prefer calling her my acquaintance. I mean we get along but I wouldn't call her a friend yet. Back on topic! My nails! So I had a really hard time wanting to take off the last mani. I ended up wearing them for almost a week. By the time I took remover to my fingers I had already taken off the studs the night before. When I took them off I though "You look fine", so I kept them. Long story short the black studs in this manicure are the exact same set of studs I had used in my previous gradient and black manicure! I figured why not use them again if I'm only going to get 50. Not only that but they hold up just fine, like they have never been used before!
Do you guys reuse nail art supply's like studs? I like saving larger studs and of course stuff along the line of charms.
Showing posts with label black and white. Show all posts
Wednesday, 7 May 2014
Saturday, 3 May 2014
Black and White Cartoon Nails
I almost just scratched out my eye with my nail! But luckily my nail JUST missed my eye by a hair, and I ended up scratching my eyelid directly above my lashes. Crisis averted.
Today I have some nails I did a while ago(at this rate I'm going to be saying on almost every post as I'm backed up with posts galore). It's another set of black and white nails(aka the best kind of nails...at the moment).
This is my first set of cartoon nails, and I decided that I wanted to do something that was not the typical red. So I went with black and white(I mentioned that right? That I used black and white?) because I had yet to see it done like this.
In order to get this look I painted my nails white, then I painted the center chunk black all the way up to the tip. Then I painted over the tip in white. Next I went back and tried to fix up anything that was too uneven. Finally I topped it off with some matte topcoat!
I really do love how it turned out even if it's not perfect. But I think this is something I want to try again at some point. I would love to try it again with a red! I think I'll always have a soft spot for black and white.
Today I have some nails I did a while ago(at this rate I'm going to be saying on almost every post as I'm backed up with posts galore). It's another set of black and white nails(aka the best kind of nails...at the moment).
This is my first set of cartoon nails, and I decided that I wanted to do something that was not the typical red. So I went with black and white(I mentioned that right? That I used black and white?) because I had yet to see it done like this.
In order to get this look I painted my nails white, then I painted the center chunk black all the way up to the tip. Then I painted over the tip in white. Next I went back and tried to fix up anything that was too uneven. Finally I topped it off with some matte topcoat!
I really do love how it turned out even if it's not perfect. But I think this is something I want to try again at some point. I would love to try it again with a red! I think I'll always have a soft spot for black and white.
Labels:
black and white,
Kas,
matte,
Nail art
Tuesday, 29 April 2014
Black and White Nails - SPIDERS EVERYWHERE!
Don't worry folks, there will be no photos of spiders in this post.
So I found 2 spiders today in my room. One of them was IN MY BED. Then yesterday I killed another one. Now I feel like they are everywhere, and I feel like they know I am killing their friends by flushing them away. So now they are out for vengeance. Those sneaky, 8 legged, Bastards.
These are black and white nails(and a seamless segue). These were inspired by Victoria of Manicurator, and a tutorial she did for Nail It Magazine. For mine I used Wet 'n Wild French White Cream and Zoya Dahlia. I just taped of the section I wanted black and boom, magic. Beautiful, simple, magic.
So I found 2 spiders today in my room. One of them was IN MY BED. Then yesterday I killed another one. Now I feel like they are everywhere, and I feel like they know I am killing their friends by flushing them away. So now they are out for vengeance. Those sneaky, 8 legged, Bastards.
These are black and white nails(and a seamless segue). These were inspired by Victoria of Manicurator, and a tutorial she did for Nail It Magazine. For mine I used Wet 'n Wild French White Cream and Zoya Dahlia. I just taped of the section I wanted black and boom, magic. Beautiful, simple, magic.
Victoria of Manicurator
Labels:
black and white,
Nail art,
Tape,
texture
Thursday, 30 January 2014
My first gradient that I've liked liked :D
So I guess I should start with a story, because I have one. So I spent this weekend in bed in pain. If you read my last post you may have noticed I said I may have had a case of beard burn. Turns out that wasn't the only injury that night ;) But seriously though, my back was aching all of Friday, then I woke up on Saturday with lower back pain. Not only that but if I moved too far forward or sat or stood up straight the pain would just explode. It's safe to say the heating pad was my best friend for a few days. But not to worry, I'm all better not for the most part, just a achy still. Just glad I didn't need medical attention. Lesson learnt, play safely :P
On to the nails!
These nails are my attempt of recreating Sammy from The Nailasaurus's Black and White Gradient. Where she did a black and white gradient and then topped it with black and white glitter. I used acrylic paints over a coat of white and topped it with Cover Band Sticks n' Stones. In Sammy's original post Sammy points out how there is a lot going on. Originally when I started doing this I was going to add onto it because I thought there wasn't enough. Then the minute I put it on I looked at it and thought "That's enough". There IS a lot going on, but in a good way. I feared it I added anything else it would just be too much.
So what do you think of my gradient? And have you even injured your back? Doesn't it suck?
On to the nails!
These nails are my attempt of recreating Sammy from The Nailasaurus's Black and White Gradient. Where she did a black and white gradient and then topped it with black and white glitter. I used acrylic paints over a coat of white and topped it with Cover Band Sticks n' Stones. In Sammy's original post Sammy points out how there is a lot going on. Originally when I started doing this I was going to add onto it because I thought there wasn't enough. Then the minute I put it on I looked at it and thought "That's enough". There IS a lot going on, but in a good way. I feared it I added anything else it would just be too much.
So what do you think of my gradient? And have you even injured your back? Doesn't it suck?
Before glitter and topcoat
Wednesday, 23 October 2013
Nightmare Before Christmas Nails: You can't tell me you didn't see this coming!
So with all the polishes inspired by The Nightmare Before Christmas I decided to do a Nightmare Before Christmas manicure. Again I haven't seen this movie in forever but I remember the gist of it.
First I did 2 coats of Claws Polish Voodoo, a red jelly full of red shimmer *drools*. Then when that was good a dry I taped off triangles and painted the rest black. With a striper I added some white stripes with acrylic paint. Finally I finished with a rhinestone at the tip of the triangle.
See what I did there?
It's the pattern on Jack Skellingtons suit AND a Santa hat!
Note: Remember how I said my internet was all wacky and not working. Well my internet has been semi fixed. It's now sort of working. Do you know how long these photos took me to upload? Almost 10 minutes. What is this 1997? I can't deal with this. And email is even worse. I don't wanna get into this. *weeps*.
First I did 2 coats of Claws Polish Voodoo, a red jelly full of red shimmer *drools*. Then when that was good a dry I taped off triangles and painted the rest black. With a striper I added some white stripes with acrylic paint. Finally I finished with a rhinestone at the tip of the triangle.
See what I did there?
It's the pattern on Jack Skellingtons suit AND a Santa hat!
Note: Remember how I said my internet was all wacky and not working. Well my internet has been semi fixed. It's now sort of working. Do you know how long these photos took me to upload? Almost 10 minutes. What is this 1997? I can't deal with this. And email is even worse. I don't wanna get into this. *weeps*.
Tuesday, 3 September 2013
KKCenterHk Full Nail Water Transfer Stickers: They're MELTING!!!
So first of all if you haven't it would be great if you could go over to the previous post and answer those questions. My friend and I need to figure out what people like and what people don't like on vlogs. And for the record the reason we want to know this isn't as obvious at it may seem, but I'll get into details later. But I think(I hope) you guys will all love what we have in mind :P
Now today I have water transfer sticker from KKCenterHk in Illusion. It's a bunch of black and white swirly illusion patterns. It looks pretty cool both up close and far away! Now I decided to try these because I had already given water decals a go, but nothing that covered the whole nail. These looks like normal nail polish stickers/wraps, but they apply just like the smaller nail art decals.
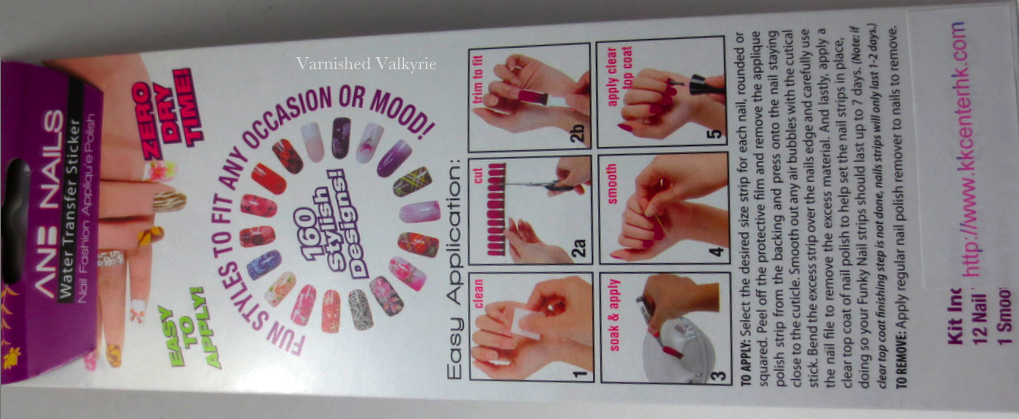
On the back of the packege there is a set of instructions, both in pictures and written out. This was a bit confusing. 1)The photo wasn't clear that after you dip it in the pater you then take it off the back. 2)The written instructions didn't even mention putting it in water.
Here are some things I noticed about these. Once you get them off their backing after dipping them in water they apply just like nail polish appliqués or stickers. Although because of the water when you put them on they may be a bit slippery a first. Something else I noticed was while they were very easy to put on you had to be VERY careful, as they are VERY delicate and tear easily. Especially when you file the tips off. So a trick I learnt for getting rid of the tip was acetone. You can watch these melt with acetone. I would cut the tip as close as I could to the nail, and then get a brush soaked in acetone. I then would place the brush on top of the portion hanging off my nail and it would literally just melt away. On the melting topic, you can also do clean up with this like you would for polish. But be careful because again these are delicate and it's easy to melt away too much. Also there is a clear border around the actual design, but that's easy to melt away too.
Something I noticed after a day of wearing them was they had started to crack. Even though I had added a layer of topcoat(Sally Hansen) like they suggested, I added another coat that seems to be holding strong.
While these aren't as durable as some of the other nail wraps and polish appliqués I've tried, and the designs aren't as crisp, I would completely buy them again for a special night out. They have some pretty unique designes. I would just use 2 layers of topcoat next time!
If you would like to try these out you can find them over at KKCenterHk where they retail for $8.52 USD. And get 10% off with our coupon code 'varnishedvalkyrie'!
*Product sent for honest review
Now today I have water transfer sticker from KKCenterHk in Illusion. It's a bunch of black and white swirly illusion patterns. It looks pretty cool both up close and far away! Now I decided to try these because I had already given water decals a go, but nothing that covered the whole nail. These looks like normal nail polish stickers/wraps, but they apply just like the smaller nail art decals.
Came in a set of 12 and had a petite nail file
On the back of the packege there is a set of instructions, both in pictures and written out. This was a bit confusing. 1)The photo wasn't clear that after you dip it in the pater you then take it off the back. 2)The written instructions didn't even mention putting it in water.
Here are some things I noticed about these. Once you get them off their backing after dipping them in water they apply just like nail polish appliqués or stickers. Although because of the water when you put them on they may be a bit slippery a first. Something else I noticed was while they were very easy to put on you had to be VERY careful, as they are VERY delicate and tear easily. Especially when you file the tips off. So a trick I learnt for getting rid of the tip was acetone. You can watch these melt with acetone. I would cut the tip as close as I could to the nail, and then get a brush soaked in acetone. I then would place the brush on top of the portion hanging off my nail and it would literally just melt away. On the melting topic, you can also do clean up with this like you would for polish. But be careful because again these are delicate and it's easy to melt away too much. Also there is a clear border around the actual design, but that's easy to melt away too.
Something I noticed after a day of wearing them was they had started to crack. Even though I had added a layer of topcoat(Sally Hansen) like they suggested, I added another coat that seems to be holding strong.
While these aren't as durable as some of the other nail wraps and polish appliqués I've tried, and the designs aren't as crisp, I would completely buy them again for a special night out. They have some pretty unique designes. I would just use 2 layers of topcoat next time!
If you would like to try these out you can find them over at KKCenterHk where they retail for $8.52 USD. And get 10% off with our coupon code 'varnishedvalkyrie'!
*Product sent for honest review
Labels:
black and white,
Kas,
KKCenterHk,
Review,
water decals
Subscribe to:
Posts (Atom)