Showing posts with label Striping Tape. Show all posts

Friday, 6 November 2015

Rest! (And something else everyone NEEDS)

So I have been exercising guys, and today is my rest day. I have actually been trying for the past few weeks. Even my diet

*And that is where I left the post for almost 2 days*

When I started writing this I had just come home from a show where I hit the back of my head on the floor. I realised after writing one line, this post wasn't going to happen, the laptop backlighting was making my head throb even more. Don't worry I'm ok now despite being a bit behind now with some reviews.  So lets pick up where I left off.

Even my diet has changed for the better. And it's been great because I have actually been sticking to it for WEEKS now. Probably for over a month. And I know that might not seem like much, but for someone who hasn't exercised in probably 8 years this is a big deal. My first goal is to get my high school body back, which I think is feasible. I weigh about the same as I did then, but back then I had more muscles as I was athletic. I want my mini 6 pack back, and I want it better than it was before. Maybe I'll do fitness posts! But not today. Today is nails!

I have for you striping tape from The Born Pretty Store. But not just striping tape, striping tape that comes is different sizes! 1mm(which is stander), 2mm and 3mm. Can I just say I love these. First, the larger sizes are super east to handle, also it is sooooooooo nice to have options. 1mm is just so thin, and that can be great depending on what you are doing, but if you want anything larger you have to start cutting up bigger pieces of tape, which can be a pain. Or you have to double or triple up on the tape, which takes more time and is prone to mishap.

I think everyone should check this out. Striping tape is a great option for any level nail enthusiast and I think the larger tapes are must haves for any nail art lover. You can get a pack of three in either gold or silver over here on sale for $1.99 USD (Normally $3.28). And you can use out 10% discount code EAL91!

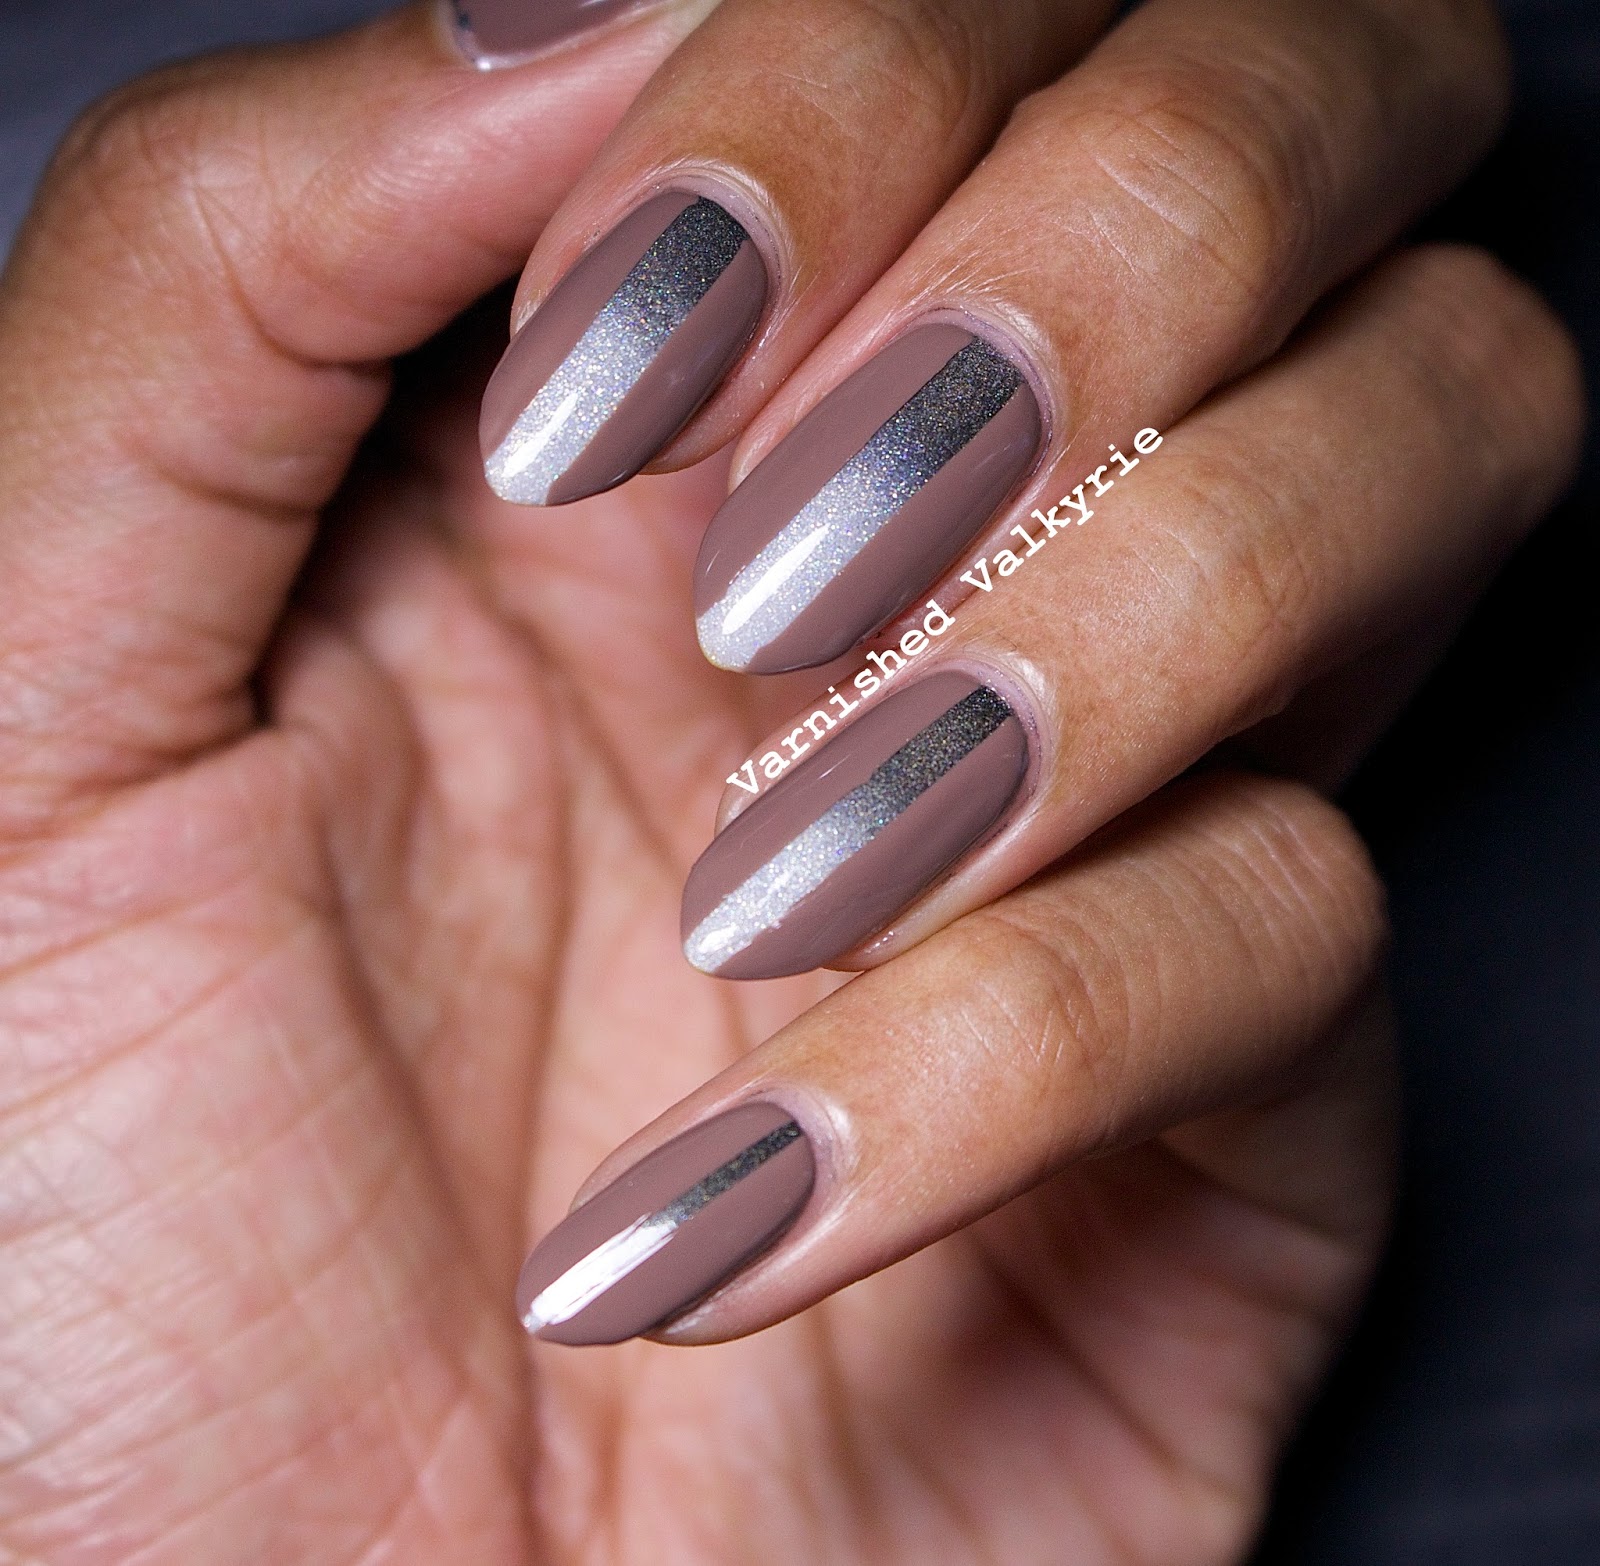
The order of use is 3mm, 2mm and 1mm in all three of the previous images.


*In case you want to know more about the other aspects of the manicure the base is Beyond The Nail's Winter Wonderland with Mattese Elite's Revolution sponged on top. And then the brown I used earlier was OPI's Over The Taupe. The full manicure was inspired by a mani I saw but I can't for the life of me remember who did it. So if you know please tell me :(

Monday, 10 August 2015

These nails have been approved by Spider-Man

So the other day I was a HOT MESS. I did a really pretty eye look in the morning, but I was in rush and I forgot to put on mascara. So when I was out I bought some really cheap NYC stuff. THEN I realized I forgot to put on deodorant(and I need it guys, Old Spice Sweat Defence in After Hours is a life saver), sooooooo I went out and found a cheap bottle of Dove's deodorant for men(I hate how woman's deodorant smells), and bought it. FINALLY when I went home that night from the boys place, I wore my shirt inside out, IN PUBLIC. And just so you know this shirt is literally a different colour when it's inside out(The shirt is just a mass of colours thrown together and when it is inside out the pattern is still there, but it looks like a faded yellow and blue shirt).

So in the spirit of unplanned things happening here is a manicure I didn't plan on doing :P

This popped up on my tumblr dashboard yesterday, a pretty, pretty, Prada, purse, photographed by Maurizio Di Iorio. And I knew I had to do something inspired by it. This whole look was done using tape(minus the blue), because I'm not skilled enough to draw perfect lines. I started with a base of China Glaze's Stoked to be soaked. Then I taped off half the nail with scotch tape and added OPI's Over the Taupe, then with striping tape I added the yellow, which is Sinful Colors Pull Over. Finally I added Sally Hansen's *Pacific Blue for the tips. It is safe to say myself along with Spider-Man like my nails.


*Pacific Blue is SUPER deceptive. It is not that intense in real life. Although a lot of swatches look that intense, that is how it photographs a lot of the time. Yes, it is vibrant, but it's not that vibrant.

Wednesday, 1 July 2015

Oh Canada!

Today is Canada Day! Which means it's time for a Canadian manicure! I say that like I do something every year, when in reality this is a first. And I wont lie, it's mainly because I find the maple leaf complicated to draw. It's easy, but even easier to mess up. So I was thrilled that I had a maple leaf stamp to use from The Born Pretty Store.

Honestly though, the manicure is just ok. I used Barry M Blood Orange for the solid red, and I used Essie Fishnet stockings for the stamping, as Blood Orange was horrible to stamp with. Then I just added OPI's My Boyfriend Scales Walls to the red nails. I also used that as a base for the stamping. The red was streaking all over the place 1)Because that red has a tendency to bleed and streak and 2)I had JUST thinned out my top coat, and it's more watery consistency did not help the cause :/

What do you think? Have I failed the country I love so much?

PS. I feel so bad I'm running a couple days late with a review post, but I have no light box which is making photos harder to take. Hopefully in the next couple of days I will have one. It will make taking photos soooooooo much easier!

PS. HAPPY BIRTHDAY ROBYN!

Friday, 17 April 2015

Art Deco: Third Times The Charm?

So I have a cold...again. This is my THIRD cold THIS YEAR. I know exactly who I got each cold from, but at the same time I probably should be treating my body a bit better so I'm not so susceptible. I really wanted to do my A-Z challenge yesterday, but I just feel too blah to do anything fun with my nails. So here is a mani I did a few days ago using my Catrice polish I just reviewed.

Since I have been wanting to do more nail art the past few weeks, but I have been super busy, striping tape, has coming in handy. It can be quite time consuming, depending on the design, but I find that when using it for accent nails you can get away with doing more creative designs without taking forever.

I wore Catrice's Oh My Goldness for a day, but after that first day, I just knew I had to add some art deco to it. It just felt like it was calling out for it. The designs weren't hard to do, but they were a bit tricky trying to get everything even when using my non dominant hand. The rhinestones are from KKCenterHk. I think it's safe to say that I am really loving this manicure.


Saturday, 11 April 2015

Smooth Braiding

I don't own a lot of Essie's. Actually there's a lot of brands I don't own a lot of, but when it comes to Essie I tend to stay away on purpose. I find their formula can be his or miss. The only time I ever buy an Essie polish is if I think the colour is super unique. This is one of those times.

This is Essie's Smooth Sailing. A STUNNING periwinkle blue, with fine flecks of silver, blue and pink. This is probably tied with Lots of Lux for best Essie formula. It was 2 easy coats, and it evened out really well. Funny story about this polish, I hadn't worn it in years because I wore it when I had some tests done at the hospital, and it always reminded me of the hospital after that. But when I was looking at it in the bottle the other day I thought "F**k it! It's too pretty not to wear!".
 

I also did some nail art that used this polish. I tried out this braid look. I had literally seen it(or variations of it) 4 or 5 times the past week on various social media platforms I follow, so I had to give it a go. I used striping tape, but the lines aren't as crisp as I would have wanted them to be, but as I learnt it's much harder when you start using more colours at once. You need to move much, much faster. For this I used Essence Oh My Glitter(which I need a new bottle of because it's amazing), Sally Hansen's Piqué Side, and of course Essie's Smooth Sailing.


Wednesday, 23 July 2014

Simple and "Understated"

So as I said before the past few weeks I had been doing a show with my sketch troupe(I don't think I mentioned that part). We do shows all the time, but this time we were doing a festival so it was kind of a big deal. When it comes to my nails on stage I take a few things into consideration. 1)What am I wearing? I need everything to look like one uniform outfit. 2) Is it distracting? This does now limit me from wearing bold colours, it just means maybe we save the bright green for another time. 3) How important is the show? If it's honestly just a small casual gig I can go all out. But bigger shows I tone it down.

This manicure I did for Montreal Sketch Comedy Festival. To me this show kind of falls in the middle. It's a big-ish show, but it feels more laid back. So I still don't want distracting nails, but I can still have some fun. My original idea was simple and understated. Long story short as you can see the nails are simple, but then. Understated they are not. That being said they didn't pose a distraction risk as they went perfectly with my dress for the night.

Black polish is Orly Liquid Vinyl, the studs are from Born Pretty Store, the gold glitter is China Glaze Gold Medallion, and I THINK the other gold polish is an unnamed Dior. I of course used striping tapes for the lines.


Monday, 30 June 2014

Happy World Pride - Part 2: Fail + I'm Going Slightly Mad

A couple nights ago I was really tired when I got home so I took an hour long nap. When I woke up there was this MASSIVE bug of sorts flying around the ceiling. I did what every normal person would do at that point. I pulled my covers over my head and hoped the winged, terror would leave me be. When I eventually emerged the bug was gone. I use the word gone loosely because 95% of the time my bedroom door is shut. So there was a large chance that he(or she) was still in my room. But at the same time this was 2 days ago and I have yet to see her(or him) again. This seemed weird because it was huge! So part of me now thinks that maybe I was seeing things. You know that moment right when you wake up and you aren't really all there? Maybe in that moment my head was making things up? I feel like I'm going a little batty...

Now moving along to the fail!

This manicure was inspired originally by this manicure by Finger Polish Mania. And of course the colours I used were inspired by pride. I am not a fan of mine personally. First of all some of the colours I didn't have the right shade in polish, so I had to use paint. When it comes to using tape paint has a tendency to seep. Lucky for me once it dried I was able to scrape some of the paint off my nail to make the lines appear more clear. My second issue was the red polish (H&M Cherry). Now before I put on top coat my nails were drying for a good few minutes. The minute I put on TC the red would streak. Every. Single. Time. And it was just the red polish! And then other colours started to get messed up because I was fiddling with it. Overall this manicure frustrated me.


 Heart on my thumb. I did really like how this turned out!

Sunday, 1 June 2014

Cher! (Probably not the one you are thinking of)

So this week has kind of been a bit up and down for me. I wont get into it because feelings are gross. They should be suppressed until you one day end up loosing your shit and running down the street, naked, and covered in jelly, while blasting Queen through an old skool boom box, laughing and weeping all at once.

One good thing that happened this week was Cher Lloyd came out with her new album! Now if you don't know who she is SHAME. She is my fun time jam music. I will admit she isn't for everyone but I can't get enough of her! She started off on The X Factor UK. When she started I can't say I liked her style(especially her eyebrows, they were downright frightening at the time. Think 2 emaciated caterpillars), but now for the most part I kind of love it(eyebrows included). This manicure is based off an outfit she wore in a photoshoot.

I used Ruby Kisses Blue My Mind, Some white Wet n Wild polish and Zoya Dahlia and striping tape. I loved this manicure, but for the first time ever after about a day I started to pick on the textured polish. I don't normally do that, but I really felt the need to this time.


Wednesday, 2 April 2014

SPORTS...'n' stuff - The return of the Wiki Series

So I decided to not do an April fools thing this year.  If you forgot, last year I pretended to have an AMAZING giveaway, only to reveal it was fake. I can safely say people reacted strongly to it.  If I'm going to do April fools, I'm not going to play around.

Today I have something that is not blue! I noticed the past few posts have been very blue centric.  Today I bringing back the Wiki Series! If you don't know what that is it's something I did last year.  Essentially if you are short on nail ideas you go to Wikipedia, and click 'Random Article'. You get 3 tries at most, and out of those 3 random articles you choose the one that inspires you the most.  From there you do a manicure inspired by the article. You can choose more than 3 articles if you get something you really don't understand, or something that's not nail inappropriate(no one wants to see your D-Day nails).

When I searched the random articles this time round I got the 1969–70 European Cup Winners' Cup.  Even though I don't follow sports I was really excited about this.  Mainly because this is one of the few sports I know a bit about even though I don't watch. When I was reading the article I saw that the winners were Manchester City F.C., I immediately knew I needed to do Man City nails, because I knew exactly what I waned to do.  I really wanted to do Manchester City kit nails. I ended up doing the ones they wore for the 1967-70 European Cup, which as you can see were black and red and the goalkeeper in green. The whole manicure was done using polish(Revlon Red Carpet, Sinful Colors Hey, you!, Orly Liquid Vinyl), and striping tape.

Despite the fact that I don't care all that much about sports I actually really liked this and was sad to take it off.  Even though it was inspired by sports, it still worked well as a general manicure.


Tuesday, 25 March 2014

Sinful Coloor New Wave + I think I'm telepatic

So I have some polish AND art for you guys today!

First up I have Sinful Colors New Wave.  I bought this at a warehouse sale with George.  The weather was something like -30 and it was WINDY.  And yet you could not keep us away from those polishes.  It was totally worth it.  I would honestly say this colour is the closest I have to a Nine/Ten TARDIS blue.  It's a deep navy blue, but it's a bit dusty in real life.  The formula was excellent, I almost didn't need a second coat.


Then I decided I need to add some art to it, and for the first time ever I got out a piece of paper and started to draw some designs on it.  One of them involved tape, but I didn't really like it.  After doing this for a while I was out of ideas.  So I decided to lurk the interwebs for inspiration.  That's when I came across this manicure by Nailside after searching 'Gold nail art'.  It was actually the same design I had drawn, but it looked much better off of paper.  I have seem post from her before, but had never seen that specific manicure.  So that is how I telepathically took her idea.  Or would could have just both come up with the same design, but that answer is too easy.  To achieve this look I cut out triangles out of scotch tape.  Then I used a piece of striping tape on either side of it.  Then for the Gold I used Milani Gold Glitz.


 The ring finger had a bit of a bubbling incident :/

Tuesday, 21 January 2014

Neon Pop! Oh, and Varnished Valkyrie turns 2 today!! Huzzah!!

Sorry I haven't been updating often, but I have been having bouts of insomnia and it leaves me feeling drained.  I'm hoping that passes soon.  I have nothing really interesting to share apart from I made the best slow cooker ribs ever.  The end.

Today I have this simple manicure inspired by Silvia Lace Nails: Textured nail art with a subtle splash of neon.  I loved how the colour looked just popping through the black textured polish.  For mine I used Milani's Dude Blue and Zoya's Dahlia.  I kind of changed up the french as you can see.  It's still simple, but a but a bit funky.  And even though the textured polish was layered over polish it still wore like iron.


In celebration of turning 2 don't forget to check out our 2 year anniversary wishlist giveaway!!

Friday, 8 November 2013

An Enthralling Surprise

SUP VALKYRIES

Today I have a simple little mix for you, made with stamps and striping tape. My base colour is Revlon Enthrall, my accent colour is Maybelline Bold Gold - which stamps wonderfully, so I would recommend it if stamping is your jam!

Revlon, I have talked some serious sh*t in the past, and now I gotta take it back. You're redeeming yourself with Enthrall. Look at that sparkle! I hope Kas will swatch this polish for you, it's absolutely gorgeous and my (lack of) photo skills can't do it justice!


 In some lights, this polish just looks brown, in others it glows a beautiful olive green with green and red/gold glitter. It's a real chameleon and I'm so glad I bought it! I can see myself reaching for this colour a lot.


Left to right: Born Pretty plate M57, stud, BP plate RuiZ04, stripes.

Has a brand you thought you hated ever surprised you?

Friday, 25 October 2013

hey look a post from Robyn

HEY FRIENDS

Since Fingers posted this super cute dotticure, I've had this colour combo rolling around in my head. Dots are definitely not my forte, but I love me some stripes!

My base colour is OPI French Quarter for Your Thoughts, a light, creamy grey. I love this colour so much, I think it's the only polish I've worn 3 times within a month!


With striping tape and OPI Uh-Oh Roll Down the Window*, I made some diagonal stripes along half of each nail. The tip is Essie Go Overboard, with a gold stud for shazam. I think it looks very military.


How much do you love striping tape!?

*The worst polish name ever. Everyone gets their own gross mental image with this one. WHAT WERE YOU THINKING, SUZI.

Thursday, 26 September 2013

It's my BIRTHDAY!!! Let's have a DALEK RAVE!!!

So I am officially old.  Time to set me adrift of an ice floe.  Also these aren't actually my birthday nails as much as I wish they were.  I did them last week when my camera was still working.  My nails aren't too special today.  Even though it is my birthday I wont be celebrating till this weekend.

In my head I imagine this is what Daleks would look like if they decided to stop being evil, and started going to raves instead.  I think the 50th anniversary episode should just end with all the doctors, companions and bad guys giving each other big hugs and then having a dance party.  It doesn't have to make sense.  Trust me when I say it will work.

For this piece of nail art magic I used these circular florescent studs from The Born Pretty Store.  The package in total has 350 pieces, and comes with both circular and square studs.  Both the square and circular studs come in 6 colours(Blue, purple, yellow, pink, orange, and green).  They were super easy to place on the nail.  I found they were easier then a silver or gold stud when it came to picking them up.  I don't know if it has to do with the coating(which btw is so much more vibrant in real life!)  These also glow under florescent lights,  but my camera pooped out before I could get the bulb.  At some point I will show you them being all glow-y.  For the lines I used striping tape and Color Club Harp On It.


If you would like some fabulous studs for fabulous nail art head on over to the Born Pretty Store website.  And don't forget to use our code EAL91 for a 10% discount!  Also remember shipping is free :D  You can buy something in honor of my birth!

Ps.  As you can see I have my camera back.  They fixed the part that covers the battery, but it feels slightly flimsy now.  I'm going to have to be extra careful with it.

Monday, 22 July 2013

Nail Night!: Are you giving me hamburger nails?

So Robyn and I decided to have a nail night the other night.  The plan was simple.  Have a few drinks and do each others nails, but the other person had no clue what they were going to get.  But long story short, Robyn gave me pretty orange, black and gold nails and I gave her burger nails.

With real sesame seeds.

What did you expect from me?  Normal?

Robyn's manicure she did for me was an orange skittle design.  I personally don't do many skittle because for some reason coming up with ideas for more than two nails that are different is difficult for me. I loved the orange she used.  I can't think of the name right now but it's from a recent OPI collection.  The black studs did bleed a bit I should add.  But to my surprise the black striping tape did not!  I Don't know where she bought it but it held up well!


Note from Robyn: The orange is OPI A Roll In The Hague, stamped/striped with Maybelline Color Show Bold Gold, and the glitter is Milani 531 Gold. Striping tape from Born Pretty Store.The studs are from this fun little package that I got for my birthday!

These are burger nails.  I did them for Robyn.  They are majestic.  I used OPI's Over the Taupe, acrylic paint and sesame seeds.  I had to buy a bagel bun and scrape them off.  I treated the seeds like I would nail studs.  Then I finished with top coat so they didn't fall off/get wet.


Note from Robyn: I just finished watching Metalocalypse and all I could think was HAMBURGER TIME.

Do you guys ever have nail nights?

Monday, 1 July 2013

It's my party and I'll watch spend all day doing my nails and watching cartoons if I want to

I am 25 today! Not into it. Being an adult is not cool. So I've spent all day watching Samurai Jack and putting together a fabulous manicure.

2 Kleancolors for this look: Mystic Grass, stamped with Black. I added some striping tape and rhinestones for shazam. Super digging these!

The unicorn stamp is Winstonia W117 and the leopard is M57 from Born Pretty Store.

A rare thumb shot! My thumb cuticles are normally totally gross but they're not too bad lately. Enjoy!

Oh, happy birthday to Canada as well. I guess I can share.

Saturday, 20 April 2013

Classy nails that took 3 days to do.

That was my first thought when I looked at these nails.  Classy.

I sort of love these 2mm Gold nail art chains from KKCenterHk.  I have been seeing them pop up every now and then over the past few months and I think they look amazing.  Especially this size.  While I'm not sure I would use it as a full manicure again(I wont lie they aren't hard to cut with normal scissors but they aren't exactly easy).  They are thin enough that they don't seem bulky.  Placement was also tricky to get all the chains lying flat.  Because at times when you were holding them they would bunch up.  I used nail glue on some fingers and topcoat on others.  I don't think the ones with the glue will come off any time soon.  And one of the topcoat ones already fell off :(  The problem with putting them on with TC is you have to move fast, and the faster I moved the more likely the chains were to bunch up.  I'm sure had I done the manicure in one go it would have stuck on easier(due to somewhat squishy polish).

Minor problems and all I can't wait to wear them again!


Oh and this took 3 days to do because I painted them white on day 1, added stripes on day 2 and finally added the chains on day 3.  That's just how I roll.

These retail for $4.25USD and each pack comes with 150cm of chain.  But get an additional 10% off with our discount code 'varnishedvalkyrie'!

Oh and who's ready for a giveaway...A REAL giveaway!

*Product was sent for honest review.
Related Posts Plugin for WordPress, Blogger...