So I have been collecting polish for almost three years now. I don't have a huge collection(by nail folk standards), but I do have way more than any other normal person. When I buy polish I am a bit picky about what I get. I could care less that x polish is super popular, if I don't absolutely love it I just can't buy it. I am a selective collector! Well I FINALLY decided that I needed to add a proper yellow and orange to my collection. Yes, you herd me correctly. In all my years of collection polish I have never actually bought a yellow or orange polish! I currently own two yellows(One was sent for review and is pretty much done, and the second I bought in a four pack because I wanted two of the other colours) and three oranges(Two were gifts and one was part of the four pack I just mentioned). So I decided what better time to loose my orange/yellow virginity. Because you are never too old(NO MATTER WHAT SOCIETY SAYS!)
First up I have Sinful Colors Pull Over, originally from their 2011 spring Tropical Ecstasy, but seen more recently in their Boldacious Collection. This is a taxi cab yellow. The formula was a bit runny, and this took me three coats. It's not the best formula, but it is ok. And because I mainly just want this in case I ever need a base for art I am ok with that.
Next up I have China Glaze Stoked to be Soaked, from their 2014 Stoked to be Soaked summer collection. When I picked this polish up the store I originally found it in was selling it for 20% off. Since I wasn't looking for a specific orange I decided I would wait to see if I found something cheaper. I then decided to check out a beauty supply store and just rummage through their sale bin. Lo and behold, what was looking right up at me with its toxic fume eyes, but this little guy. Not only that but it was 70% off! WEEEEEE! SALES!
What colours do you not on many of?
Showing posts with label Yellow. Show all posts
Friday, 10 October 2014
Thursday, 31 October 2013
F4 - Hocus Pocus: Well worth the wait.
Well Halloween has come and gone. And I'll be honest with you guys the one thing I will be missing will be the horror movies that are always on the television. I love a good(or hilariously bad) horror film.
This polish that I wore today was part of F4's Halloween line last year. I didn't wear it last year so I decided that this year I was going to wear it on Halloween for the first time. I wanted my first time to to be special guys. So I have been sitting on this polish for over a year and that day has finally come. Let me tell you it was well worth the wait(OMG she used the title of the post in the post...like in movies).
I decided to go with the obnoxious look. My base was a bright orange by Orly(I could not find the name on the mini bottle), and I used one coat of Hocus Pocus over it. Hocus Pocus is tiny matte black glitter and pink glitter, as well as larger pieces of green and yellow glitter. Formula was super easy to use and you could probably get this to be opaque on its own in 3 coats or so.
So do I do Christmas stuff now?
Have you tried F4 polishes? Do you think this was worth the wait? Do you like scary movies? Which ones? TELL ME!
This polish that I wore today was part of F4's Halloween line last year. I didn't wear it last year so I decided that this year I was going to wear it on Halloween for the first time. I wanted my first time to to be special guys. So I have been sitting on this polish for over a year and that day has finally come. Let me tell you it was well worth the wait(OMG she used the title of the post in the post...like in movies).
I decided to go with the obnoxious look. My base was a bright orange by Orly(I could not find the name on the mini bottle), and I used one coat of Hocus Pocus over it. Hocus Pocus is tiny matte black glitter and pink glitter, as well as larger pieces of green and yellow glitter. Formula was super easy to use and you could probably get this to be opaque on its own in 3 coats or so.
So do I do Christmas stuff now?
Have you tried F4 polishes? Do you think this was worth the wait? Do you like scary movies? Which ones? TELL ME!
Sunday, 14 July 2013
3D Lego Nails!
Ugh As soon as clicked on the new post button, the new post page loaded and then my internet immediately cut out! It obviously was down a few days ago when the power went our but for the past few weeks it's been finicky in general. Anyways I hope you had a great few days. I had a new first! A man followed me the other day! Luckily is was by a busy road, and when I lost him I went and hid in a store for a bit.
Now onto things that aren't creepy men!
I've been wanting to do 3D nails for a while now but wasn't sure what I wanted to do. I knew I didn't want anything too over the top, or something that would interfere with me doing things. So a few nights ago I was looking at The Daily Nail's site, and I came across these Lego nails. Not only did I think they looked nifty, I thought I could do something like that but actually make it 3D.
First I painted my nails the base colour of whatever the block was going to be. Next I placed between 2-6 pieces of KKCenterHk gold circular glitter down depending on how many bumps the block was going to have. After that I got out some nail glue, placed a tiny bit on each piece of glitter, and stacked another piece of glitter on top of the original piece. Then I repeated that step so each of the bumps consisted of 3 pieces of glitter. When that was done I got out my acrylic paint and painted over just the bumps, focusing on the sides. Following that I went over the entire nail with the acrylic paint (you may need to do this more than once if the base colour of polish is slightly different than the paint). Finally I topped it of with a couple thin coats of top coat.
Note: My pinky finger was done entirely with polish because I didn't have the shade of green I wanted in paint. While you can do this entirely with polish I found it much easier with paint. Not only that but I found the bumps were more more defined with paint.
What do you guys think of 3D nails? Thoughts on creepy men?
Now onto things that aren't creepy men!
I've been wanting to do 3D nails for a while now but wasn't sure what I wanted to do. I knew I didn't want anything too over the top, or something that would interfere with me doing things. So a few nights ago I was looking at The Daily Nail's site, and I came across these Lego nails. Not only did I think they looked nifty, I thought I could do something like that but actually make it 3D.
First I painted my nails the base colour of whatever the block was going to be. Next I placed between 2-6 pieces of KKCenterHk gold circular glitter down depending on how many bumps the block was going to have. After that I got out some nail glue, placed a tiny bit on each piece of glitter, and stacked another piece of glitter on top of the original piece. Then I repeated that step so each of the bumps consisted of 3 pieces of glitter. When that was done I got out my acrylic paint and painted over just the bumps, focusing on the sides. Following that I went over the entire nail with the acrylic paint (you may need to do this more than once if the base colour of polish is slightly different than the paint). Finally I topped it of with a couple thin coats of top coat.
Note: My pinky finger was done entirely with polish because I didn't have the shade of green I wanted in paint. While you can do this entirely with polish I found it much easier with paint. Not only that but I found the bumps were more more defined with paint.
What do you guys think of 3D nails? Thoughts on creepy men?
Labels:
3D Nail Art,
Acrylic paint,
Blue,
Chunky glitter,
Essie,
Green,
KKCenterHk,
Nail art,
Red,
White,
Yellow
Monday, 29 April 2013
I'm going to call this art.
So I have an appointment with those Mac Geniuses tonight and we'll see what going on with my laptop. Until then I am relegated to taking iPhone photos, uploading them to tumblr, and then uploading them to photo bucket where I attempt to tag them. Like some neanderthal. Also the compute I'm using right now is so-so. I gets the job done but as far as photo quality on this computer I can't actually tell if photos look good or not.
If they decided to keep my laptop hostage I will still try and post. But unless it is a proper review for something that was sent to us I won't be taking photos with a real camera.
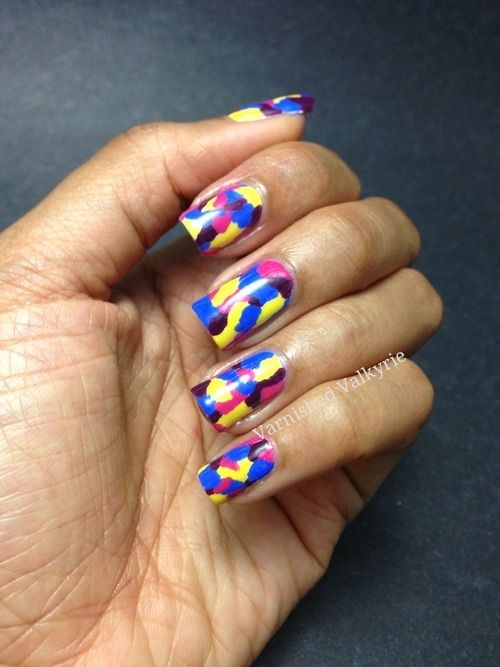
Well yesterday I really wanted to do some nail art but I had no clue what I wanted to do(as usual). My brain immediately was drawn to these colours(I would name them but all the bottle are in another room and I don't have it in me to get them atm). In the end I ended up blobbing them together. My only problem was it bubbled a bit but it's not that noticeable so I'm not going to complain.
Easy nail art. My favourite!
If they decided to keep my laptop hostage I will still try and post. But unless it is a proper review for something that was sent to us I won't be taking photos with a real camera.
Well yesterday I really wanted to do some nail art but I had no clue what I wanted to do(as usual). My brain immediately was drawn to these colours(I would name them but all the bottle are in another room and I don't have it in me to get them atm). In the end I ended up blobbing them together. My only problem was it bubbled a bit but it's not that noticeable so I'm not going to complain.
Easy nail art. My favourite!
Labels:
Blue,
Born Pretty Store,
China Glaze,
Essence,
Kas,
Nail art,
Pink,
Purple,
Sally Hansen,
Yellow
Thursday, 21 March 2013
Why yes, my nails do have a healthy uranium glow!: Introducing my Wiki Series.
First don't forget our giveaway! Only a few hours left!!!
So the past couple of weeks I have been busy so I haven't really had time to make my nails pretty for you guys. Not only that but as far as nail art goes I've just been feeling a tad uninspired. I do have some manicures planned but I'm saving them for specific days.
While looking for inspiration, I remembered something. A friend who I do sketch with said that he always carry's an encyclopedia around. If he doesn't know what to write about he just turns to a random page and writes about whatever he sees first. Now I didn't have a encyclopedia(The children's one I have does not count). But I have Wikipedia. So I decided to see if Wikipedia could help me get inspired. And it's easy because they have an option where you can choose a random article!
Now I made up a few rules/cheats:
1) If I don't like the first article or I just want to see if I can find something that inspired me more I can select a max of 3 articles. Once 3 are chosen I must choose one.
2) Things that are inappropriate I can disregard and they are not counted as one of my possible 3 articles. (War, murder etc.)
3) I can disregard things that aren't articles. (If the word has different meaning or it's people with the same name it will sometimes send you to a page that gives you options for different articles that have the same title). Not counted in possible 3 choices.
4) Vague articles can be disregarded. I had an article pop up that was a sentence saying it was a patch of land somewhere. Depending on article I can choose to disregard it.
So what was my first random article? *Drumroll*
92!
Yup the number 92. I looked over the article and saw that it was the atomic number of uranium. Huzzah inspiration! I have Sally Hansen's Ivy League and it reminded me so much of glowing uranium, I knew I had to use it somehow. So I ended up doing these toxic nails! I used that, BK polish in number 19 from the Born Pretty store and acrylic paint and OPI's black shatter(didn't think I would be using that anytime soon).
I can't want do another wiki article inspired manicure!
So the past couple of weeks I have been busy so I haven't really had time to make my nails pretty for you guys. Not only that but as far as nail art goes I've just been feeling a tad uninspired. I do have some manicures planned but I'm saving them for specific days.
While looking for inspiration, I remembered something. A friend who I do sketch with said that he always carry's an encyclopedia around. If he doesn't know what to write about he just turns to a random page and writes about whatever he sees first. Now I didn't have a encyclopedia(The children's one I have does not count). But I have Wikipedia. So I decided to see if Wikipedia could help me get inspired. And it's easy because they have an option where you can choose a random article!
Now I made up a few rules/cheats:
1) If I don't like the first article or I just want to see if I can find something that inspired me more I can select a max of 3 articles. Once 3 are chosen I must choose one.
2) Things that are inappropriate I can disregard and they are not counted as one of my possible 3 articles. (War, murder etc.)
3) I can disregard things that aren't articles. (If the word has different meaning or it's people with the same name it will sometimes send you to a page that gives you options for different articles that have the same title). Not counted in possible 3 choices.
4) Vague articles can be disregarded. I had an article pop up that was a sentence saying it was a patch of land somewhere. Depending on article I can choose to disregard it.
So what was my first random article? *Drumroll*
92!
Yup the number 92. I looked over the article and saw that it was the atomic number of uranium. Huzzah inspiration! I have Sally Hansen's Ivy League and it reminded me so much of glowing uranium, I knew I had to use it somehow. So I ended up doing these toxic nails! I used that, BK polish in number 19 from the Born Pretty store and acrylic paint and OPI's black shatter(didn't think I would be using that anytime soon).
I can't want do another wiki article inspired manicure!
Labels:
Acrylic paint,
BK polish,
Black,
Born Pretty Store,
Green,
Kas,
Nail art,
Sally Hansen,
Shatter,
Wiki Series,
Yellow
Friday, 8 February 2013
Loudest ColoUr indeed...
So a while ago I showed you one of my first polishes by Sation, over this one. Loudest Color(oh how I wish people would learn to spell properly.. COLOUR :P) is a fabulous neon with a texture that's almost jelly-like. It's somewhere between neon green and neon yellow, definitely leaning green.
Now, I know neons aren't everyone's thing. For the life of me I cannot understand why, but that's another conversation for another day. They just give me a case of the cheerfuls! How can you not feel happy looking at bright and peppy neon colours???
But anyway, onto the actual polish: Application was good, a little thick, but in general nothing that a little extra care couldn't fix. I used two coats for these swatches, and it looked more opaque IRL. It's also a little greener in person and a WHOLE LOT more retina-searingly bright. As you can see from the last photo, this polish is kind of a chameleon. I love it <3
Natural light, no flash.
Now, I know neons aren't everyone's thing. For the life of me I cannot understand why, but that's another conversation for another day. They just give me a case of the cheerfuls! How can you not feel happy looking at bright and peppy neon colours???
But anyway, onto the actual polish: Application was good, a little thick, but in general nothing that a little extra care couldn't fix. I used two coats for these swatches, and it looked more opaque IRL. It's also a little greener in person and a WHOLE LOT more retina-searingly bright. As you can see from the last photo, this polish is kind of a chameleon. I love it <3
Natural light, no flash.
Sunday, 20 January 2013
The verdict is in: I like this better then OPI Spotted.
Yeah I definitely like the water spotted nails better. I'm glad I didn't spend a silly amount of money on the OPI one. If you don't know what this technique is watch the vid a linked to. But if you don't want to here's a quick how to. 1)Fill a container with room temp water 2)Drop droplets of polish in water of colour you would like to be on top 3)Spray with hand sanitizer 4)Stick your finger in it 5)Boom done.
Now the OPI one is unique BUT it always reminds me of dirty water drying slowly. You know when you spill something and it starts drying in random patches. You know!
With this technique I feel like the base colour and the colour you choose to use on top of it look better together. They look like 1. Does that make sense? Anyways there are not perfect(See right hand) but I will for sure try these out again. They are much easier then water marbling! And you can do them in any colour!
I used OPI My Boyfriend Scales Walls for the base and Black Onyx for the top. I did the accent nails with Milani Dude Blue and BK Sweet Candy Fast Dry Nail Art Polish in #19* on my left hand and China Glaze Urban-Night and Essie Pretty Edgy on my right.
* I need to add something about the BK Sweet Candy Fast Dry Nail Art Polish in #19. In my original review I said it took between 3-4 coats to reach opacity. Well I was wrong. I used two coats when I did my accent nail. I think my problem last time was I never waited long enough which caused constant dragging and bald spots. I have failed you. *hangs head in shame*.
Now the OPI one is unique BUT it always reminds me of dirty water drying slowly. You know when you spill something and it starts drying in random patches. You know!
With this technique I feel like the base colour and the colour you choose to use on top of it look better together. They look like 1. Does that make sense? Anyways there are not perfect(See right hand) but I will for sure try these out again. They are much easier then water marbling! And you can do them in any colour!
I used OPI My Boyfriend Scales Walls for the base and Black Onyx for the top. I did the accent nails with Milani Dude Blue and BK Sweet Candy Fast Dry Nail Art Polish in #19* on my left hand and China Glaze Urban-Night and Essie Pretty Edgy on my right.
Left hand
Right hand
Thursday, 17 January 2013
Dayum! These nails are hott!
The minute I chose BK Sweet Candy Fast Dry Nail Art Polish in #19 I knew I wanted to do badass sun nails. Despite my general hatred for all things space related I still thought this was a great idea.
I already had on the yellow BK polish from yesterday. So I added to that by using the saran wrap method and splotching on Orly Holla. Then I painted in the black with acrylic paint and finished up with more Holla to give it that pretty glow-y, solar flair-y look.
So tell me. Are you glad or what you'll be long dead by the time our sun turns into a red giant and annihilates the earth?
I already had on the yellow BK polish from yesterday. So I added to that by using the saran wrap method and splotching on Orly Holla. Then I painted in the black with acrylic paint and finished up with more Holla to give it that pretty glow-y, solar flair-y look.
So tell me. Are you glad or what you'll be long dead by the time our sun turns into a red giant and annihilates the earth?
Sun nails with just the sponging
Flash!
Natural light.
This is not a photo of my nails.
Wednesday, 16 January 2013
My FIRST yellow polish! - BK Sweet Candy Fast Dry Nail Art Polish
Yes it is true I am, well was a yellow polish virgin. Now I don't have gallons of polish. I probably have just over 200. But you would think that in just over 200 bottles of polish there would be at least one yellow. Now I have nothing against the colour yellow I just always thought it looked yucky against my skin.
When asked to review some other stuff from the Born Pretty Store I decided why not go crazy and get a yellow polish? I ended up going with the BK Sweet Candy Fast Dry Nail Art Polish in #19. The best way to describe it is a SpongBob yellow cream, with uber fine shimmer. Although as you can see in the pictures depending on the lighting it can look like a more vibrant yellow. I used 4 coats for complete opacity on my left hand and 3 on my right. I would have used 3 on my left but I had a bit of dragging which resulted in balk spots. I think next time I'll use 2 coats over white. But over all the formula was superb. Easy to control and not too thick or too thin.
I should also add I don't know if this is 3-free. None of the ingredients are written in English. Minus the letters DBP in brackets. With the help of a translator I saw found the words toluene and formaldehyde. And the section that had these words was written in all black rather then white like the rest of the text. So I think it might be. But don't take my word for it.
Tomorrow I'll show you what I did with this polish on day 2 of wearing it!
Now tell me your innermost feeling on the colour yellow. This is a safe place.
ETA: Wait! I do have a yellow polish! It's an Orly mini. But it only half counts because I bought it in a 4 pack and because I wanted the orange that the pack came with. This is the first time I have intentionaly sought out a yellow polish.
When asked to review some other stuff from the Born Pretty Store I decided why not go crazy and get a yellow polish? I ended up going with the BK Sweet Candy Fast Dry Nail Art Polish in #19. The best way to describe it is a SpongBob yellow cream, with uber fine shimmer. Although as you can see in the pictures depending on the lighting it can look like a more vibrant yellow. I used 4 coats for complete opacity on my left hand and 3 on my right. I would have used 3 on my left but I had a bit of dragging which resulted in balk spots. I think next time I'll use 2 coats over white. But over all the formula was superb. Easy to control and not too thick or too thin.
I should also add I don't know if this is 3-free. None of the ingredients are written in English. Minus the letters DBP in brackets. With the help of a translator I saw found the words toluene and formaldehyde. And the section that had these words was written in all black rather then white like the rest of the text. So I think it might be. But don't take my word for it.
Tomorrow I'll show you what I did with this polish on day 2 of wearing it!
Now tell me your innermost feeling on the colour yellow. This is a safe place.
ETA: Wait! I do have a yellow polish! It's an Orly mini. But it only half counts because I bought it in a 4 pack and because I wanted the orange that the pack came with. This is the first time I have intentionaly sought out a yellow polish.
In natural light
Lightbox
Don't forget to check out the Born Pretty Store for awesome nail polish and fun, amazingly priced nail art goodies! And use our discount code (EAL91) to get a 10% discount on you purchase!
*Products were sent for an honest review
Labels:
BK polish,
Born Pretty Store,
Kas,
Swatch,
Yellow
Sunday, 4 November 2012
Vert.
Love, love, LOVE this colour!
Now I'm a big fan of colours that border on pretty-ugly and this for sure is one of them! Orly's It's not rocket science is green/yellow glitter flakies in a mossy green base. As you can see it also flashes a blueish green in the bottle. I used 3 coats to get it completely opaque. She sparkled like crazy.
For some reason when I look at this polish it always reminds me of B-movies. That's another point for this polish.
Now I'm a big fan of colours that border on pretty-ugly and this for sure is one of them! Orly's It's not rocket science is green/yellow glitter flakies in a mossy green base. As you can see it also flashes a blueish green in the bottle. I used 3 coats to get it completely opaque. She sparkled like crazy.
For some reason when I look at this polish it always reminds me of B-movies. That's another point for this polish.
Saturday, 3 November 2012
The best part of Halloween?
Candies, of course!
Well, actually not. I don't eat most candy being that I am apparently some sort of alien. Really just chocolate and like caramel and things of that nature. I am learning to like gummies but I can't chew them without feeling queasy so methinks the battle will be long ad arduous so I may just stop fighting and not eat candy.
But candy is pretty awesome on nails, as evidenced by the adorable manicure that I did last week after I applied my lovely white base! I added some Ghoulish Glow on top to make it a little more fun but forgot to take photos in the dark. C'est la vie!
So here is a cute little candy manicure! I used about a million polishes and I can't remember them all but off the top of my head:
Urban Outfitters Bandeau
Zoya Charla
Zoya Ivanka
Cult Nails Annalicious
OPI Fly
OPI Did It On Em
Color Club Almost Famous
Color Club Fly With Me
OPI Pompeii Purple
OPI Too Hot Pink To Hold Em
OPI Y'all Come Back Ya Hear
OPI The Show Must Go On
Revlon Royal
Orly Glitz and Glamour (which is the gold bits and also the best warm gold ever)
Well, actually not. I don't eat most candy being that I am apparently some sort of alien. Really just chocolate and like caramel and things of that nature. I am learning to like gummies but I can't chew them without feeling queasy so methinks the battle will be long ad arduous so I may just stop fighting and not eat candy.
But candy is pretty awesome on nails, as evidenced by the adorable manicure that I did last week after I applied my lovely white base! I added some Ghoulish Glow on top to make it a little more fun but forgot to take photos in the dark. C'est la vie!
So here is a cute little candy manicure! I used about a million polishes and I can't remember them all but off the top of my head:
Urban Outfitters Bandeau
Zoya Charla
Zoya Ivanka
Cult Nails Annalicious
OPI Fly
OPI Did It On Em
Color Club Almost Famous
Color Club Fly With Me
OPI Pompeii Purple
OPI Too Hot Pink To Hold Em
OPI Y'all Come Back Ya Hear
OPI The Show Must Go On
Revlon Royal
Orly Glitz and Glamour (which is the gold bits and also the best warm gold ever)
Labels:
Blue,
Color Club,
Cult Nails,
George,
Gold,
Green,
Nail art,
OPI,
Orange,
Orly,
Purple,
Red,
Revlon,
Urban Outfitters,
White,
Yellow,
Zoya
Friday, 12 October 2012
Glitter Herpes + Vajazzle? I swear this is still about nail polish...
So I've been pretty good about not buying any more polish lately(as in I just haven't bought any except with gift certificates), but I DID bite the bullet when I came across Polish Revolution and saw these.
Now, by now anyone who's read anything I've written here knows that GLITTER is my favourite thing. So when I saw that Lauren had such amazing glitter polishes with such a great variety... I knew I had to have them. They're so obnoxious and loud and crazy and just ME. I'm sure these will make some of you nauseous... Can't say I care :P
So, Vajazzle is a mix of warm and cool toned glitter, and Glitter Herpes is straight up cool toned.
I absolutely love these. The glitter is dense and EXTREMELY varied. There are more colours than I can count and lots of shapes and sizes, including my beloved square glitter. For these swatches I've shown ONE coat of each over black and then over white(Colour Club French Tip and Where's The Soiree, my new favourites of each, YOU NEED FRENCH TIP!). These applied easily using the dabbing method and there are no bendy glitters to be seen. I topped these with Gelous and Seche Vite, but they weren't too grainy to begin with. I also mattified them so you can see the mix better!
Once again, try to excuse my cuticles. I had to clean a machine at work yesterday and they took a beating. Nothing a few days of being nice won't fix!
Now, by now anyone who's read anything I've written here knows that GLITTER is my favourite thing. So when I saw that Lauren had such amazing glitter polishes with such a great variety... I knew I had to have them. They're so obnoxious and loud and crazy and just ME. I'm sure these will make some of you nauseous... Can't say I care :P
So, Vajazzle is a mix of warm and cool toned glitter, and Glitter Herpes is straight up cool toned.
I absolutely love these. The glitter is dense and EXTREMELY varied. There are more colours than I can count and lots of shapes and sizes, including my beloved square glitter. For these swatches I've shown ONE coat of each over black and then over white(Colour Club French Tip and Where's The Soiree, my new favourites of each, YOU NEED FRENCH TIP!). These applied easily using the dabbing method and there are no bendy glitters to be seen. I topped these with Gelous and Seche Vite, but they weren't too grainy to begin with. I also mattified them so you can see the mix better!
Once again, try to excuse my cuticles. I had to clean a machine at work yesterday and they took a beating. Nothing a few days of being nice won't fix!
Look who joined me on the balcony for pictures <3 It's Sophie! She just turned 10.
Thursday, 11 October 2012
This Is Halloween...: My First OFFICIAL Halloween Manicure
So here it is. Feast your eyes on this masterpiece! Maybe not masterpiece but it's ok.
I really just wanted to do a somewhat simple design for this. When I saw my NK Vibrant Orange for the first time I knew I had to do something with pumpkins. It's classic. Initially I was going to do all the nails in Vibrant Orange and do carved pumpkins on my thumb and ring finger. Then I decided I didn't want the pumpkins to be orange. I LOVE how eerie Halloween pumpkins look at night when they have a candle in them, and they just have that creepy glow to them. So I went with a pumpkin in the night look. Then I did some funky tips by just using a striping brush and making lines. I actually saw this done on a blog and I wish I could remember which one :(
Stay tuned for more Halloween badassicures. I really don't know how bad ass they will be. In my head they are quite bad ass. But my hands don't always listen to my head.
I really just wanted to do a somewhat simple design for this. When I saw my NK Vibrant Orange for the first time I knew I had to do something with pumpkins. It's classic. Initially I was going to do all the nails in Vibrant Orange and do carved pumpkins on my thumb and ring finger. Then I decided I didn't want the pumpkins to be orange. I LOVE how eerie Halloween pumpkins look at night when they have a candle in them, and they just have that creepy glow to them. So I went with a pumpkin in the night look. Then I did some funky tips by just using a striping brush and making lines. I actually saw this done on a blog and I wish I could remember which one :(
Stay tuned for more Halloween badassicures. I really don't know how bad ass they will be. In my head they are quite bad ass. But my hands don't always listen to my head.
Best picture I had with the fanged pumpkin.
Tuesday, 25 September 2012
Marmite Nails AND Our 150th Post! What Could Be Better Than That?
Thank you for sticking around this long. Here's to 8375290394543789405.200 more.
Anyways I don't know what you do at 4am, but I know I attempt nail art.
So if you've read this blog for a while now you probably already know I LOVE Marmite. It's my salty elixir, from the yeasty gods(This post also now contains the WORST sentence ever used in this blog). Especially on grilled cheese. Mmmmmmmmmmmmmmmm... What I'm trying to say is if you can go and try some. You might like it. Maybe love it?
So I've wanted to do Marmite nails for a while now. But I always kind of shied away from it. Even if it's only on one nail, nail art that doesn't consist of lines or dots is a challenge for me. Small lettering frightens me like a Weeping Angels frighten Amy and Rory. Maybe it was because it was 4am and I was feeling bold I decided to just try doing a Marmite jar on my thumb(never intending to post it). And you know what? I didn't hate it(like Marmite!)! So I decided to do the rest of my nails Marmite themed and using my striping tape. And I put the love and hate on my index and pinky finger because you wither 'Love It or Hate It'. The ring finger is gold because you can currently get limited edition jar with gold coloured flecks in it!
All in all it's not my best manicure BUT I did step out of my comfort zone by actually trying some more detailed stuff!
Anyways I don't know what you do at 4am, but I know I attempt nail art.
So if you've read this blog for a while now you probably already know I LOVE Marmite. It's my salty elixir, from the yeasty gods(This post also now contains the WORST sentence ever used in this blog). Especially on grilled cheese. Mmmmmmmmmmmmmmmm... What I'm trying to say is if you can go and try some. You might like it. Maybe love it?
So I've wanted to do Marmite nails for a while now. But I always kind of shied away from it. Even if it's only on one nail, nail art that doesn't consist of lines or dots is a challenge for me. Small lettering frightens me like a Weeping Angels frighten Amy and Rory. Maybe it was because it was 4am and I was feeling bold I decided to just try doing a Marmite jar on my thumb(never intending to post it). And you know what? I didn't hate it(like Marmite!)! So I decided to do the rest of my nails Marmite themed and using my striping tape. And I put the love and hate on my index and pinky finger because you wither 'Love It or Hate It'. The ring finger is gold because you can currently get limited edition jar with gold coloured flecks in it!
All in all it's not my best manicure BUT I did step out of my comfort zone by actually trying some more detailed stuff!
(L-R) OPI Black Onyx, acrylic paints, Essie Pretty Edgy, Sally Hansen Gilty Pleasure and gold striping tape.
Labels:
Acrylic paint,
Black,
Essie,
Food,
Gold,
Green,
Inspired by:,
Kas,
Marmite,
Nail art,
OPI,
Orange,
Red,
Sally Hansen,
Striping Tape,
Yellow
Subscribe to:
Posts (Atom)